Smoke is a very useful tool for creating the illusion of depth and distance. It can be used as an atmospheric effect, or it can also be combined with other effects such as lighting, color correction, etc., to create more complex images. In this tutorial you will learn how to create smoke effects in Adobe Photoshop, using three methods, to enhance the look of your images.
The Filter Method
This method involves using a filter. First, we’ll create a new layer above the image layer to make our rendition.

Go to Filter>Render>Clouds. This image will fill the layer.
If you don’t like the result, return to the Filter>Render>Clouds again until you get the result you want. Once you have what you want, go to the layers panel and choose the Screen mode from the layer menu. The result will look something like this:

Use a soft eraser brush to remove the excess smoke so that it looks more natural.

You can also change the opacity of the smoke. We decreased it to 62% and erased more of the smoke.

Play around with the opacity and eraser brush until you achieve the most realistic effect.
The Soft Brush Method
You can use this method to create both fog and smoke. Go to the Brush panel in the Options bar at the top of the screen and change the brush mode to Dissolve. Change the brush opacity to 10%.
Add some dots where you need to have smoke. Then go to Filter>Blur>Gaussian Blur and play around with the pixel level. Also, change the layer opacity to around 10%.

If you’d like to add more depth to your smoke, create a new blank layer above the first one and repeat the brush and blur process. Select both layers, right-click and select Merge.

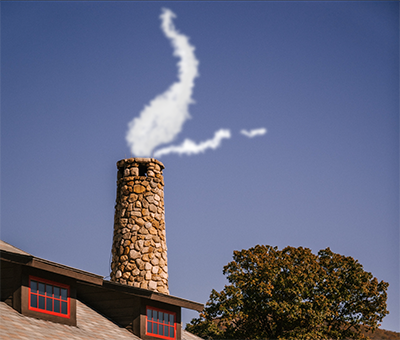
This is the final result. It’s much more subtle than the smoke we created with the filter method, which is what we intended. Smoke can be thin and wispy, or it can be thick and dark.
Smoke Brushes
You can make your own smoke brushes, if you’re willing to invest the time in learning how to make them. We’ll cover how to do that later in this tutorial. For now, we’ll cover how to use the ready-made brushes that will make it easy to apply smoke effects to your images.
Step 1: Go to Pexels, Pixabay or other free image sites and find a photo of a used candle. Erase the background. Then create a new layer below the candle layer and set it to have a black background. Select both layers, right-click and select Merge Layers from the pop-up menu.

Step 2: If you haven’t loaded your smoke brushes into Photoshop yet, do so now. Then select your brush, position it over the wick and apply the effect. If the result turns out too crisp, apply a Gaussian Blur and adjust the pixel radius until the smoke softens to the point where you like it. Here is our result:

Creating a Custom Smoke Brush
We’re going to walk you through creating your first custom smoke brush. This method takes the longest and requires patience. Once you learn how to make your first brush and use it to create spectacular effects for your images, you’ll be hooked.
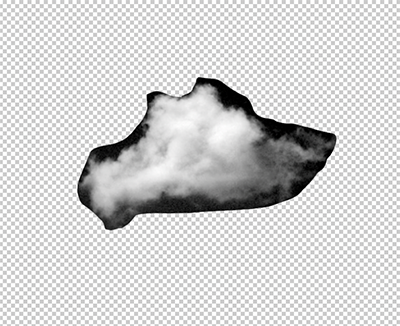
Step 1: Go to one of the free stock image sites and download a picture of a sky with billowy clouds of different sizes. Import the image into Photoshop.
Step 2: Grab the Lasso tool, select a small cloud and cut it out. Create a new layer and paste the cloud there. Hide the cloud photo so that you can see the cut-out.

Step 3: Next, go the Channels tab, select the Red channel, and duplicate it. The background color of the sky will turn black.
Press Command/Control+L to bring up the Levels box.

Adjust the levels so that the background color is very dark. Once you have it set to the darkness you like, press OK.
Step 4: Press Command/Control+i to Invert the selection. Use the Eraser tool to get rid of any excess background. This might take the longest time, especially if details are faint or lost.

Once you’re finished, drag the cloud onto a new layer in the Layers panel.
Step 5: Select the cloud with the Lasso tool. Then go to Edit>Define Brush Preset. Move your cursor anywhere on the layer. You should see an outline of your brush.
Move it beneath the photo and hide it from view.
Step 6: Create a new layer above the photo. You will use this layer to create your smoke image.
Step 7: If you try to use the brush, as it is, you’ll achieve a poor result. So, what you need to do is change the shape dynamics. Click on the Brush icon on the top right panel, make sure your new brush is selected and click on the Brush Settings tab.

Click on Shape Dynamics and move the Size Jitter and Angle Jitter all the way up. Draw your smoke and see how it looks. You may have to adjust your angle jitter if it doesn’t look the way you want.
If it doesn’t look quite right, try adjusting the Scatter. If you are using your tablet or drawing pad, experiment with the Transfer settings.
We set the brush mode to Dissolve and used the Gaussian blur to soften the edges so that they appear more wispy. This might not be a necessary step for you, especially if you have achieved the result that you want.
You’ve learned three ways to create smoke effects for your designs. Try them out and let us know which works best for you!
Frequently Asked Questions
How Do I Make Colored Smoke In Photoshop? Which Method Would I Choose?
It depends on whether you just want to apply a subtle effect to an existing design or if you want to completely transform the subject matter. For example, if you want to give a vintage feel to a modern product, then adding a gradient could help. But if you were looking to replace every pixel of an image with a specific color, then applying an overlay filter would probably be better suited.
How Do I Make A Smoke Bomb In Photoshop?
The process is pretty much identical to creating a firebomb except instead of cutting out a flame, we’re going to cut out a piece of smoke. To start off, open up a blank document in Photoshop.
Next, grab the Rectangular Marquee Tool and draw around the area where you want to place the smoke. Make sure you don’t include anything else within the rectangle, because once you remove the smoke, everything outside of the marquee will disappear too.
Now, simply copy and paste the smoke into the empty space. It’s important to keep the original file intact because when you delete the smoke, you won’t be able to undo it later. Finally, add some text above the smoke and voila – you now have a beautiful smoke bomb.
How Do You Make Black Smoke In Photoshop?
Black smoke can be created by either painting directly on a background layer or by placing a solid colored fill behind another object. In both cases, there’s no real trick to making black smoke other than knowing how to paint properly.
Start by selecting a dark grayish-black color such as 1B2D3E. Once you select the color, press Ctrl+T to bring up the Color Picker window. Then, drag down from the middle of the color wheel until you reach 0% opacity. When you release the mouse button, the color should turn fully opaque.
Now, go ahead and paint onto any white areas of your canvas. As long as you’re careful about blending modes, this technique shouldn’t cause any problems. Just remember to always blend toward 100%.