You have a photo where the subject is wearing a beautiful off-the-shoulder sundress that your client wants to promote. She has tan lines on her shoulders that will distract the viewer from the dress. How can you match the skin tone of the untanned skin with the tanned skin? Our Photoshop tutorial will show you how.
Things to Consider When Matching Skin Tones
- The sun exposure level. This determines whether or not there’s any difference between the two tones. If they’re both exposed equally, it doesn’t matter what color you use. However, if one side was more heavily exposed than the other, you’ll need to ensure that the darker area matches up as closely as possible.
- What kind of lighting is used? A flashlight source would be much different than natural sunlight. You may consider using a high essential technique instead of a low key.
- Is this just a single shot or part of a series? In some cases, you might want to keep the original image and add another layer on top of it. Then you could apply whatever adjustments you like without affecting the underlying layers.
- Are these areas going to appear together again later in the shoot? For example, maybe she’s standing next to someone with tan lines. Or perhaps she’s sitting down at a table with people around her. It’s best to avoid matching colors when those elements come into play.
- Do you plan on doing anything else to the image after removing the tan line? Maybe you’d like to change the background to look less distracting.
- Does the person look good either way?
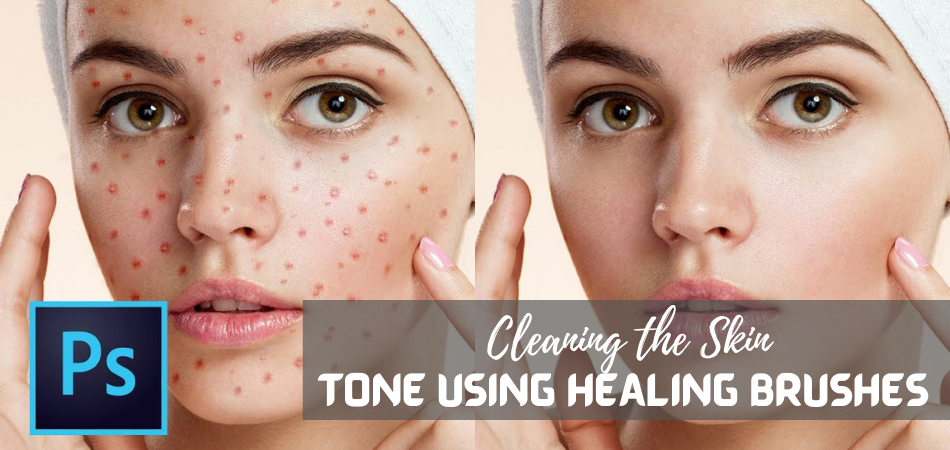
Cleaning the Skin Tone Using Healing Brushes
The first step is to create a selection for each body section that needs work. Use the magic wand tool. Click once inside the area that needs attention, hold Shift while pressing the mouse button, and repeatedly click until all unwanted pixels are selected—Press Ctrl+A/Cmd+A to fix everything within the selection. Now press Delete to remove them. Paste the copied merged file onto a separate layer above the rest of the image. Rename the layer “healing.”
Now we’re ready to clean things up! Create a new layer below the existing layer called “skin” and name it “new_layer.” Select the Brush Tool. Set its size to about 50% larger than the largest area of the problem. Choose an appropriate soft round brush such as Round Radial Gradient 2px. Change the opacity setting to something like 30%. Start painting over the offending spots. Don’t worry too much about getting every last bit out; you don’t need to get rid of all of the old paint. Just concentrate on making the new stuff blend smoothly with the surrounding skin. Once you’ve finished, go back through your selections and delete the ones that aren’t needed anymore. Save your project.
If you have trouble selecting the right spot, you can always zoom in close and see where the edges meet. That should help you find the exact place to begin.
Using the Curves Adjustment Tool
You can correct problems caused by uneven exposure by adjusting the curves. This will allow you to adjust the overall brightness level of the entire photo. To access the curve adjustment tools:
- Open the Levels dialog box from the Window menu. The default settings are fine unless extreme differences between highlights and shadows exist.
- Drag the black point slider left or right to increase or decrease the amount of shadow detail. Depending on how far you drag, this will make the dark parts darker or lighter.
- Drag the white point slider left or right. This will affect the lightest details in the picture.
You’ll probably notice that the changes made to the level adjustment seem only to affect one color channel. To fix this, open the curves window again and adjust the other two channels independently.
Adjusting Color Balance
Open the Hue Saturation dialog box from the Edit Menu. You may want to set the saturation level to zero if the photo already seems overly saturated.

Drag the sliders to balance the image’s red, green, blue, and yellow components. Try not to move the hue too far toward purer hues because they tend to be more difficult to recover later.
When you’re done adjusting the colors, save your document.
Using Multiple Adjustments Layers
This method works best when using multiple adjustment layers instead of just one. It’s easier to control which areas receive different amounts of correction at once rather than having to correct each part individually.

To add another adjustment layer:
- Name the layer, whatever you’d like. For example, let’s call it “Color Correction.”
- Double-click the top most layer to bring up the Properties panel for that layer. Click OK to accept the current values.
- Go ahead and click OK again to apply the next step to both layers.
- Now select the Layer Mask icon. A mask appears around the entire image.
- With the Magic Wand selected, click inside the masked area. All pixels within the selection become transparent. Anywhere else becomes opaque.
- Use the Brush tool, Paint Bucket tool, or Eraser tool to fill the space with some neutral gray.
- When filling the canvas, press Ctrl+D/⌘-I to deselect everything. Press Alt+Ctrl+A/Option+Command+A to merge the active layer into its parent group.
- Select the original layer and rename it “Original.”
- Repeat steps 4–8 until all the corrections are complete.
- Finally, name the final layer something descriptive, such as “Final” or “Done!”
Conclusion
We’ve taken you through the steps to create an easy way to remove unwanted elements from photos without Photoshop’s built-in tools. We hope these tips have helped!