Lens flare frequently occurs in photography and happens when light reflects off the lens’s front element and into your camera, resulting in unintended highlights on subjects that shouldn’t be illuminated in such a manner. This issue is particularly noticeable when capturing images during sunrise or sunset, as the abundant sunlight directly strikes the front part of the lens. Likewise, excessive use of flash in dim lighting conditions can also lead to this problem.
This tutorial will show you three ways to remove the unwanted lens flare from your photos using Photoshop.
Cloning the Flare

The clone stamp tool is an excellent choice for removing flares that appear against a solid background. We’re going to remove the green flare near the top and the subtle flares that hug the edges of the light bulbs on the left.
Step 1: Select the Clone tool and make sure the opacity is set to 100%. Then choose a hard brush.
Step 2: Option/Alt-click on a small area to sample the area you want to clone.
Step 3: Brush over the flare spot until it disappears.
Step 4: View the final result and make any necessary changes.

Frequency Separation Method
The Frequency Separation Method involves separating the detail and color information. This method works well on images that don’t have much color and detail.
Step 1: Open the file in Photoshop. Duplicate the background layer twice.
Step 2: Rename one of the duplicate’s Colors and name the other detail. Hide the Detail layer and select the Color layer.

Step 3: Go to the Filter menu and select Blur > Gaussian Blur.
Set the radius to be around 10 pixels. The goal is to blur the detail but keep the color information roughly where it should be.
Click Okay.

Step 4: Select the Detail layer and turn the visibility back on.
Go to image and select Apply Image. A dialog box will pop up.
Check that the color is selected, the Channel is set to RGB, the Invert box, and the Blending to Add. Set the Scale to 2.

Click Okay.
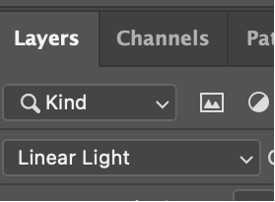
Step 5: Change the blend mode to Linear Light.

Group the Detail and Color layers. Name it Frequency Separation.
Step 6: Select the Color layer and grab the Clone tool. Brush over an area that doesn’t contain the flare. Then start painting over the flare.
Some flares will be easier to remove than others. The more colors and textures they have, the harder they will be to remove. You will also experience difficulty removing flares from detailed images because the cloning tool will eventually start to digitize what you’re trying to paint.
Depending on the image you are working on, you will also need to pay attention to the highlights and shadows so that the finished result still looks real and accurate—plan on spending quite a bit of time when using this technique.
Curves Method
The Curves Method doesn’t work as well for intensely colorful flares as the Frequency Separation method.
Step 1: Create a curve adjustment layer.

The Edit Points panel will automatically appear.
Step 2: Go into the Color Channels and select the Red color channel.
Step 3: Set a black point in the Red color channel and adjust the curve until you notice a change in the flare.

Step 4: Follow the same procedure with the Green channel

Step 5: Press Control/Command + I to invert the mask.
Step 6: Set the foreground to white and gradually paint over the flare until it begins to disappear.

Frequently Asked Questions (FAQ)
What are lens flares, and what causes them to appear in photos?
They are also called lens glare or light flare. A lens flare is caused when non-image forming light scatters in the lens system after it hits the front element of a camera lens and reflects inside the lens. Picking up the zoom lenses is most susceptible because they have many aspects.
How do I get rid of those annoying little white dots?
If you have any white spots appearing around your subject matter, they may be due to dust particles stuck between the sensor and the glass elements of your lens. You’ll need to clean them out using one of these methods:
1) Use compressed air to blow away all the dirt.
2) Clean the sensor yourself. See our guide here.
3) If neither works, try cleaning the sensor again after taking some new pictures.
What are lens flares used for?
Photographers often use them to add drama and excitement to an otherwise static composition.
How do you prevent lens flare from occurring?
You should always keep your aperture wide open, which means more light enters the lens than usual. Also, don’t shoot directly under bright lights; instead, position yourself so that the sun’s rays fall onto your subject indirectly through windows or other natural lighting sources. Finally, avoid shooting subjects close to reflective solid surfaces such as waterfalls or shiny cars. These reflections cause additional problems called “ghosting” and “flare.”
If you must shoot near these trouble spots, a lens hood will help block your lens from direct sunlight.
