In Lightroom, the feature of the tone curve allows for detailed adjustments to be made to the shadows, midtones, and highlights in your image via particular point changes. Additionally, this tool provides the capability to alter colors to achieve the exact appearance you desire. We will walk you through the steps we took to edit a photo utilizing the tone curve.
What Is The Tone Curve?
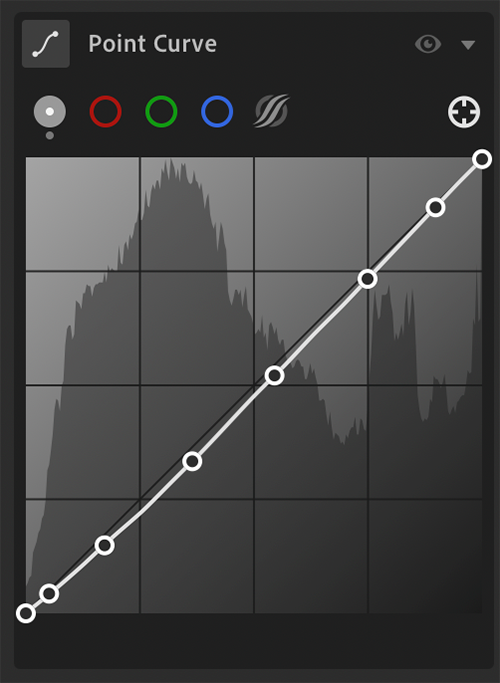
The tone curve is a linear line that runs from the bottom left to the top right. The top point is your white point, and the bottom part serves as the black point.
People typically use the tone curve as an S-Curve. This involves adding a point in the shadow portion and another in the highlight portion of the curve—an S-shape form when they manipulate these two points to adjust their exposure.
If you’ve been working with images for a while, you’ll know that every pixel in your photo comprises Red, Green, and Blue (RGB). Each pixel is assigned a color value between 0 and 255.
- 0 = no color
- 255 = full color
The red, green, and blue channels represent the values of each color you have in your image.
The tone curve also serves as a visual representation of the color range of your image. The point curve represents the overall brightness.
You can increase or decrease the brightness by moving the curve up or down. You can add multiple points along the curve to get an acceptable range of control over the brightness and colors.
Where to Find the Tone Curve
- Go to View > Edit Panels > Light
The tool will show up on the right panel of your screen.

You’ll see four hollow buttons above the curve line, plus a button with curves and another with a hollow X on the far right.
- Gray – Edits the RGB channels
- Red – Edits the Red channel
- Green – Edits the Green channel
- Blue – Edits the Blue channel
- Curve – Edits the Parametric curve
Hollow X – A target adjustment lets you adjust the Tone Curve by dragging directly in the photo.
Editing the Tone Curve
We’ll start by clicking on the Target Adjustment button.

Hover your cursor over the image and notice how you see two circles appear. One is hollow, and the other contains a color fill. Move the cursor around and notice how the filling changes color depending on its position.
Step 1: Move your cursor to the lightest element in your image and double-click your mouse button. A point will automatically occur in the white point area of the curve.
Step 2: Move your cursor to the darkest element in your image and double click.
Step 3: Follow the same procedure for the mid-tones. Your curve should look something like this:
Step 4: Grab a point and drag it up or down. Notice the changes that occur in your image. If you like what you see, release the mouse button to select it.
TIP: Before you go any further, it’s a good idea to open your original image outside Lightroom and place it next to the app interface. That way, you can compare how the changes look as you adjust the curves.
Original Image

Edited Image
While we liked how the curve adjustments added vibrancy to the buildings, we felt the sky was too bright. We intended to draw the viewer’s eye to the buildings.

To fix that, we clicked on the Red button and set the points so that the red curves lightened the sky and water, plus brightened the red buildings more.

Next, we clicked on the Blue button and followed the same procedure.

Finally, we slightly adjusted the Parametric Curve to return the stormy look to the clouds.

Frequently Asked Questions
Why is the Tone Curve Tool Better Than The Sliders In The Basic Panel?
The main difference between the two features is that you have an increased level of control when using the tone curve. You can also retain more of the original color.
How Many Points Should You Use?
You can start with 3 points. Place them at the quarter, half, and three-quarter points to create an S-Curve. Add additional points if you want to hone in on particular areas of your image.
Can I Save A Tone Curve As A Preset In Lightroom Cc?
There doesn’t appear to be a way to save a tone curve in Lightroom CC, but you can keep one in Lightroom Classic and import it to the CC version.
Where Is The Tone Curve In Lightroom Mobile?
For the iPhone, go to the Edit panel in the Loupe view. Tap the Light icon at the bottom of the screen, followed by the CURVE icon, to view the graph overlay over the photo.
How Do I Reset The Tone Curve In Lightroom?
Grab a point and pull it off the graph. Or, right-click and select Flatten Curve.
Should I Edit My Image In Photoshop Before I Edit It In Lightroom?
Lightroom is the better choice because it offers more robust photo editing features than Photoshop. It provides a photo management tool perfect for organizing your photos and editing them in batches.
Other helpful articles:
How to Edit Portraits Like a Pro With Lightroom?
How to Blur Background in Lightroom in 2 Ways
How to Dehaze in Lightroom & What Does it Do [Tutorial]
How to Whiten Teeth in Lightroom 2022