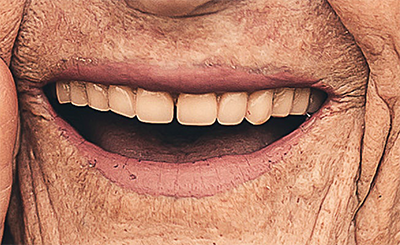
You’ve captured a fantastic picture of your friend. She’s happy with it but isn’t pleased with how yellow her teeth appear. She’s asking if you could enhance them to appear whiter and more natural. This is something you can accomplish using Lightroom, and it doesn’t matter how experienced you are. Let us guide you through the process!
The Brush Tool
This is what her teeth look like now.

Subtlety is key when whitening teeth because you don’t want your portraits to look like advertisements for one of those teeth-whitening products. We’ll use the brush tool to lighten the teeth so that they look like natural teeth.
Step 1: Click on the Brush tool. The auto mask will turn on the moment you click the brush icon. This will save you time with having to set the overlay mask.
Step 2: Click on the Preset tab and select Whiten Teeth from the drop-down menu.

The brush preset settings will automatically go into effect. You will see them on the brush panel.

The brush settings will move into place. You can adjust them later if needed. For now, we’ll start painting.
Step 3: A double-halo with a plus sign will appear when you hover over a tooth. Click once to set the brush. Then paint each tooth. As you brush, the teeth will turn red. Adjust the brush size as needed.

Step 4: Once you’re finished, turn off the overlay and check your original photo with the whitened version.
If you find that the subject’s teeth are still too yellow (or too white), you’ll need to adjust the exposure and saturation settings and try again. Increase the desaturation level if the teeth are still yellow. If you’re dealing with any gray darkness that is caused by poor lighting, use the temperature slider to make subtle changes.
Once you have the teeth looking natural, click Okay.
The final result should look something like this.
The Finished Piece
This is the final result. This lady has white teeth, and the process took less than a minute. Lightroom 2021 makes this easy!

Frequently Asked Questions
How Do You Save A Lightroom Brush Preset After You’Ve Created It?
To save a new brush, click on the area where you clicked to select the Brush Adjustment Effect. A new window will open, prompting you to name your new preset. Save it by clicking the “Create” button.
Where is the Adjustment Brush in Lightroom? You can access the adjustment brushes through the Filter Gallery or via the Adjustments Panel. To get there, press Ctrl+1 on Windows/Linux or Cmd+1 on Mac OS X.
What Happens If I Accidentally Delete My Brush Presets?
Lightroom keeps track of all brush presets you create. So, even if you accidentally delete them, you can easily recreate them using the same steps above. Just be sure not to overwrite an existing brush preset.
Can I Change The Color Of The Halo Around The Brush Strokes?
Yes. To change the color of the halos, simply drag the Color Picker onto the image or press Ctrl+I. Choose a different hue and then release the mouse button.
Is there a way to remove the halo completely?
Simply uncheck the box next to Auto Mask under the Settings section of the Brush Panel.
Can You Whiten Teeth In Lightroom Classic?
Yes. It works the same way.
How Long Does It Take To Apply A Brush Preset?
It depends on how many adjustments you make to the brush itself. But generally speaking, it takes about 30 seconds per brush.
Do You Recommend Applying Multiple Brush Presets At Once?
No. The more brush presets you add, the longer it takes for Lightroom to render the results. And since every brush requires its own rendering time, adding additional brushes slows down the entire workflow.
What Are Other Ways I Can Whiten Teeth In Lightroom?
You could also use the Exposure & Saturation sliders to brighten up the teeth. Or you could increase the contrast between the teeth and the background. These techniques work well for most people who struggle with their teeth being too dark. However, some people may prefer to keep the teeth darker since they feel more realistic. In these cases, you might consider increasing the brightness of the teeth while decreasing the brightness of the surrounding skin tones.
For example, You’d want to decrease the overall brightness of the face so that the teeth stand out against the rest of the subject’s skin tone.
Then, you would increase the brightness of the teeth relative to the skin tone.
Finally, you’d reduce the brightness of the entire image to bring down the overall brightness. That’s how you can achieve a similar effect without having to mess with the colors.
Can You Whiten Teeth In Lightroom Mobile?
Unfortunately no. This feature isn’t available yet.
Which Does A Better Job At Whitening Teeth, Lightroom Or Photoshop?
This comes down to personal preference. Both programs have strengths and weaknesses when it comes to tooth whitening. For instance, both programs allow you to adjust individual pixels within an image. That means you can make fine-tuned changes to specific areas of the photo.
On the flip side, this flexibility makes it easy to overdo things. If you’re looking for something quick and dirty, Photoshop teeth whitening has you covered. But if you need precise control, Lightroom gives you much greater precision.
Other helpful articles:
How to Edit Portraits Like a Pro With Lightroom?
How to Effectively Use the Tone Curve in Lightroom 2022
