In this tutorial, we will show you how to blur the background in your photos using two different methods within Adobe Lightroom. The first method is an easy, three-step process that can be done in about 5 minutes or less. This approach works well for most pictures; but if you’re looking for more precise control over the extent of your background’s blur, stay tuned!
The First Method
The first method involves masking around the subject of your photo and applying a blur so that everything in the background has a softer look. The focal point of your photograph will stand out with its crisp details.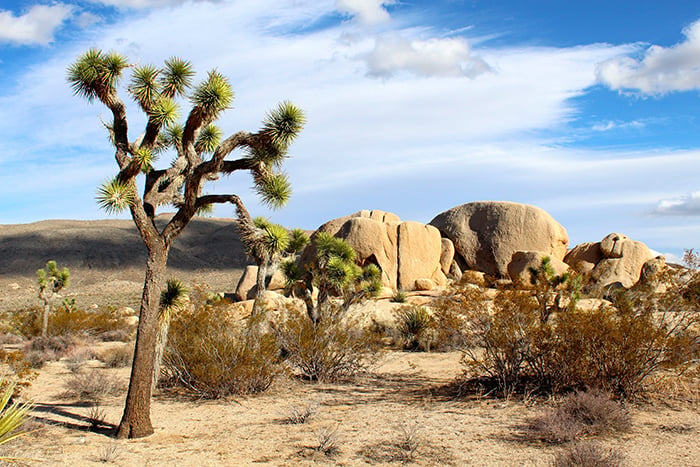 Step 1: We’re going to blur the entire background of the above image, using a mask. Create the mask and turn of the Auto Mask setting by unchecking it. Step 2: Press O on your keyboard so that you can see the mask as you’re applying it. Brush around the subject with your adjustment brush until the entire background is masked. Press O again to hide the mask when you’re finished.
  Step 3: Go to the Effects panel and slide the Texture and Clarity effects all the way to the left to create a strong blur, or move them close to the far left spectrum to achieve the blur you need for your photo.
  The edges and sharpness will disappear. There’s a consistent blurred background effect that moves from the top to the bottom of the photo.
  You can use this technique to soften the background of scenery or portraits. But let’s suppose that you’re looking to achieve a natural blur transition that moves from the top to the bottom of the image. Follow along to learn how to achieve this effect.
The Second Method
We’re going to use a linear mask to create the transitional blur that is common with modern photography. Step 1: Go to the gradient filter, position your brush at the top of the image and drag down until the bottom line is about two inches above the bottom edge of your image. See screenshot below.  Step 2: Notice how the mask covers the top of the subject. We’re going to remove the mask from that area. To do that: Go to Tools > Subtract from Mask with > Brush Step 3: Start erasing the mask from the subject. Adjust the brush size as needed to remove the mask. Step 4: When you’re finished erasing, press L to hide the mask. Step 5: Go to the Effect Panel and bring down the Texture and Clarity intensity like you did with the first blur technique.
  The sky has a blurred background, but the desert floor around the tree is not. You can adjust your gradient to bring the blur closer, or move it back so that it’s positioned farther away. Step 6: When you’re finished, click Done. You’ve learned two techniques to create stunning blur effects for your images, using powerful tools in Lightroom to help speed up the process.
Frequently Asked Questions
How Do I Blur The Background In Lightroom CC Mobile?
Lightroom CC mobile doesn’t have any built-in blurring features yet. However, there are third party apps available that allow you to apply some basic blurs. Here are three popular options: Blurb and Photo Editor Pro.
How Would I Increase The Amount Of Blur In Lightroom?
There isn’t an easy way to change the strength of the blur applied to your photos. If you want more control over the final result, then you’ll probably be better off doing this work in Photoshop instead.
Why Blur The Background Of A Photo?
The answer depends on what kind of look you’re trying to achieve. For example, if you’re shooting landscapes, you might want to add a soft blurry background to make the scene feel less artificial. Or maybe you just love the look of old film cameras where everything was out of focus.
Why Shouldn’T I Use The Radial Filter For Blur Effects?
Radial filters aren’t meant to produce realistic results. They were designed to simulate the appearance of lens flare when used during post processing. In other words, they don’t really give us much flexibility when we try to recreate real world lighting conditions.
Is It Possible To Refocus A Blurred Image In Lightroom After It Has Been Modified?
Yes! Just go into Lens Correction mode and select Refine Focus. This will automatically re-focus all areas of the image based on their current sharpness level. Which is easier to use for blurring backgrounds, Lightroom Classic or Lightroom CC? Both programs offer similar functionality, although Lightroom CC does include several new editing capabilities, such as adding text overlays and adjusting color balance. The biggest difference between them is that Lightroom Classic requires Adobe Bridge while Lightroom CC works directly within the app itself.
What Should I Know Before Applying A Blur Effect To My Photos?
Before you start working on your photos, take note of these things:
- Make sure you understand the settings in each program (e.g., which adjustments affect how light affects the edges of objects).
- Know whether you need to save your edits as separate layers or merge them together.
- Be aware of the different ways you can edit your photos—for instance, you may find yourself switching from one tool to another depending on the type of adjustment you’re making.
- Keep track of the changes made to your original file by saving copies at regular intervals. You never know when something unexpected happens, so having backups makes sense.
- Don’t forget about the RAW files stored inside your camera’s memory card. These files contain information about every detail captured by your camera, including exposure data, white balance, etc. When you shoot raw files, you get complete control over the quality of your finished product because you can adjust the details later with no loss of quality.
Can I Remove The Blur From My Photos Without Losing Too Many Pixels?
No. There are two reasons why removing blur from images causes pixelation. First, there’s simply not enough room left in the picture to fit any additional pixels. Second, even though most people think of digital photography as being “lossless,” it actually introduces some small amount of noise into our pictures. Noise comes from tiny variations in brightness caused by random factors like dust particles floating around in front of the sensor. Removing blur helps reduce both problems but doesn’t eliminate either completely.
Other helpful articles:
How to Edit Portraits Like a Pro With Lightroom?
How to Effectively Use the Tone Curve in Lightroom 2022